Saturday 23 December 2017

RPO Part 3

These CN RPO's feature an Arch Style roof with rounded ends.  An Athearn 70' Round Roof Coach was sacrificed to provide the roof.

First the roof was separated just below the upper rivet strip using a large razor Saw.


Next I scraped and sanded the roof even with the rivet strip.

It was determined that this point the roof was too wide to mate with the RPO body.  I calculated the point at which the roof narrows along the arch profile where it would be the correct width.  I used my height gage and scribed a line around the roof at this point.


Then I used a small modelling plane and my plexiglass mounted sandpaper to remove this material.


I now had an Arch roof of the correct profile and width to match the car.

The forth step was to shorten the roof to the correct length.  A razor saw and miter box were used to cut out a section from the middle of the roof.  I then used my milling machine to end mill the roof sections to the correct length to match the RPO body.   These were glued together using Testor's model cement, as it has a slow cure time compared to MEK.  I used my machined gluing jig to keep things lined up.


The final step was to reinforce the joint from the inside with some sheet styrene.


Next steps will be to detail the roof correct for the 7810-7812 series RPOs.


Tuesday 12 December 2017

Crapola!!

Well I screwed up.  I did exactly what I was being so careful not to do.

 I knocked the glue bottle and some MEK escaped. 

I ended up melting about a third of one of the RPO sides. The glue hit the back side and I thought I could save it but......... I finally admitted to myself it was gone.  I had put this much work into it I had to make it right.

 So I cut it off, just to the right side of the baggage door and spent the evening remaking the mail room end of the side.  I'm going to leave it  for a day or so now and go watch hockey highlights instead..


Monday 11 December 2017

RPO Part 2

Over the weekend I made substantial progress on the RPO.

I scratch built new sides from Evergreen styrene sheet and strip.  Commercial sized strip was used to keep things simple.

In the first photo you will see some finger clamps I constructed to assist in the process of making the sides. I saw these over on Joe Smith's Blog and thought they were just great.  Mine are made of mild steel with a piece of Tig welding wire pressed into a drilled hole.  They are basically a mini finger to hold things while your gluing etc.  What great idea and now that I have them, I can't live without them!!  Construction is done on plate glass set against a metal scale.

The first layer is made of a piece of 0.010" thick material with 0.060" quarter round on either end. The second layer is all made from 0.010" strip of varying widths.  A piece of 0.100" and 0.080" strip is attached along the top and bottom of the sides respectively.  The top and bottom of the three doors are made with 0.080" strip centered on the pencil lines.  These are made longer than actually needed.


Here is a close up of the side as described above.  The strips are set 0.010" off of the top and bottom strips to leave room for upper and lower door sills.  The top of the side is against the scale in this photo.


Next I applied the mutton's to the upper half of the door to frame door window openings.  The mutton's are 0.040" styrene and the outer edge is 0.080" which will be covered with a 0.040" quarter round door jamb that will leave a 0.040" door boarder to match the mutton size.


Here is both sides with the doors and windows all framed up. 


Next the remaining areas were filled with 0.010" sheet to complete this layer.


The third layer starts by adding 0.040" sheet on top of the second layer using individual pieces followed up with 0.010" x 0.040" strip set vertically at the top and bottom of the door openings.
Unfortunately I didn't take a close up photo. Finally I added the 0.040" quarter round on either side of the door to form the door jamb.


Next up is to cut out the window and door window openings, followed by adding the belt rail and letter board using 0.010" strip.  I will fill any seams with putty and sand if needed before mounting on the car floor.


Friday 8 December 2017

Railway Post Office Service on the Grand Trunk NEL

The Grand Trunk (NEL) rostered  three Railway Post office Cars #'s 7810-7812.  They were built by ACF in 1929, possibly for subsidiary GTW and transferred at a later date.

The Canadian National Historical Society magazine CN lines Volume 9 Issue 1 has a article pertaining to these cars and similar RPO's used on the Central Vermont and Grand Trunk Western.  Here is a picture found in Morning's Sun Colour Guide to Northern New England Cars.


I am going to kitbash one of these cars using a Branchline Coach as the base model.

I recently discovered Joe Smith's Blog "Signal Station 199" regarding his efforts in building a New Haven themed layout. He has a set of blog entries showing his techniques to kitbash a similar RPO for the New Haven.  Go take a look, but I warn you Joe's modelling and blog are top notch so your  going to be there for a while.  Here's the link...

https://signalstation199.blogspot.ca/search/label/RPO

Now that your back, here's where I'm at with this project. Follow along as I put what I learned from Joe to good use.

First off I enlarged a drawing provided in the CN lines issue and copied the dimensions over from the soft copy, that were blurry when enlarged.


Next I cut the floor and spliced it back together to give an length over the couplers of 66' - 61/2".

The floor is braced with a sheet of styrene and some square stock.


The second photo shows the floor sections I removed.  I also removed the side vestibule doors and walls on either side of the end doors.


Thursday 30 November 2017

New Workbench

Since attending the Chicagoland RPM(and recovering from an overdose of train stuff), I've not done any modelling - save for Sculptamoulding a section of my friend Pierre Olivers Wabash Layout.

But that's not to say I haven't been busy.

Over the last couple of nights I have built a new workbench for modelling.

My former bench was built over 20 years ago when I was in University and was designed with wood working in mind.  It was deep (36") and had dog holes and a large wood working vise on the left front.  Its heavy and rigid, good qualities to have on a bench designed for holding planks of wood while hand planning etc. 

It did falter as a modelling bench though.  It was to low, had no room for my legs to stretch out and was too deep for me to reach the peg board on the wall without getting out of my chair.  It was time for a new bench.  So I moved it out to the garage with the rest of my wood working tools.

Before work started on the new bench I came up with a wish list for the new one.


Higher off the ground to better match the draftsman style chair I use.

A Pegboard that I can hang tools from.

Narrower so I can reach the tool pegboard when seated.

An overhead shelf to mount a light under and store Plano boxes with parts on top. I also need to be able to reach the shelf without standing up.

Built in Power Bars on both sides of the bench.

A solid top, with a support structure design such that I can clamp stuff to both the front and sides of the top.

A foot rest to put my feet on while seated.

An increase from 5 to 6 feet long.

The ability to store a garbage can underneath.

Somewhere to store scales and rulers. (I am always misplacing them under what ever mess is on my bench.)

A pegboard on the ends of the bench to store less often used tools or other stuff like a dust pan and brush.

Somewhere to clamp reference photos so they are not propped up on the bench surface taking up valuable modelling area..

Easy to construct.


A big wish list but nothing earth shattering.

Here is what I came up with.


A simple bench constructed with 2x3's and a a Bamboo Top 72' long by 25.5" deep.   The cross brace underneath is at the perfect height for me to rest my feet on while seated.

I found a LED strip light for a reasonable cost, which was easy to mount with the included double sided tape.  The light valance also acts as a place to clamp reference photos.


As for disappearing scales?  I solved this with a magnetic tool strip.


Now back to modelling!!!

P.S.  A keen eyed observer can figure out what I'm working on, besides checking out Chris Adams Blog!!


Friday 29 September 2017

Grand Trunk 25 Ton American Ohio Model E Crane

The Grand Trunk(NEL) had at least one 25 ton locomotive crane that I know of.  It spent most of its time in Island Pond moving coal around.  For my work Train I wanted to include a crane as part of the consist.  So I kit bashed this model using the one and only picture of the crane stationed in Island Pond as reference.  The picture can be found in the John Ames Grand Trunk Trackside book published by Morning Sun.  I believe the prototype to be an American Ohio model E.

The model uses a Walthers 25ton crane for the mechanism and deck.  The rest of the kit is in the trash  bin.  I scratch built the Cab from Sheet styrene.  The Smoke box was made from acrylic turned on my jewellers lathe.  The boom is a brass etching from Custom Finishing Models, and hook is a pewter casting from the same manufacturer.  I made all the pulleys from brass tube and washers.  All the brass parts are soldered.


The big challenge with this project was the windows.  On the prototype they are fine metal bars with glass inserted and have 9 or more panes.   I tried and failed a few times before I came up with a solution I liked.  

I designed the windows in Draftsight and then printed them on overhead transparencies using my laser printer.  This captured the fine look of the mutens on the prototype.


This was a fun project and much different than the endless string of Boxcars I have been working on. Now that the fun is over its back to more Boxcars!!  


Weathered Boxcars

  Here are some pictures of my latest efforts.  I pulled out the weathering supplies and finished off a few projects that have been built, but not weathered.  Other than the Grant Trunk Tool car these cars are projects which I started in the spring but only recently finished.

  They are all weathered with MIG products washes and Pan Pastels, except the BAR car which just got an India ink Alcohol wash and some artists oils (I scratched the paint. So I  added a rust spot to cover it up.)

  In the pictures the cars all look glossier than they appear to the eye.  I need to work on my lighting a bit more to get the dusty look of the models to show up.

First up the Grand Trunk Tool Car. 


Next is a P&LE Steel Side Rebuilt Boxcar based on the Tichy kit, with many upgrades including but not limited to doors and decals from Speedwitch media.  I went heavy with the weathering on this car as it would be nearing the end of its life for my future Grand Trunk(NEL) layout time frame.


Third is a EJ&E car.  This is a Branchline Car kit bash.  It's based on an Article from the August 2013 issue of RMC.  Decals are from Tichy.


Finally a BAR PS-1 using the Intermountain kit and Highball Graphics Decals. 


Friday 15 September 2017

Grand Trunk Tool Car part 2

I made good progress on the Grand Trunk Tool car this week.  Its now painted and the decals are done.  I used True Colour CN Freight Car Red.  The decals are pieced together from and old Steam Shack Kit for a Central Vermont Single Sheathed Boxcar, which also had GTW decals included - the rest are cobbled together from a Microscale lettering set.  In my previous post I forgot to mention I removed the sill from the window to the right of the door to better simulate the flush frame as on the prototype.  The car needs weathering and brake line hoses, but I will hold off on the weathering until I get the MoW train complete as I plan to weather them all at the same time.


The Picture was taken in my new Photo Box.  My son and I put this together last weekend.   Its based on an article found in the April 2017 issue of Railroad Model Craftsman Magazine.  Basically it's a cardboard box with cut outs and tissue paper applied. The light fixtures are clamp on units from the hardware section at Lowes.  For bulbs I used LED's.  I can't remember what Kelvin, but I purchased them to match a White Balance setting available in my Camera.  Total cost was around $50.  I took these blog pictures with my iphone.  I've taken a bunch with my camera but couldn't remember where the cord was last night to download them to my computer.  The photo box really helps in taking higher quality photos.  My son loves taking photos and he spent a hour or two doing just that on the weekend.  I'll share some of his work in a future post, when I track down that cord..........


Monday 11 September 2017

Grand Trunk Tool Car

My current project is another piece of rolling stock for a typical Grand Trunk (NEL) work Train.  Inspiration came from a picture I purchased from Bob's Photos at the New England RPM in Enfield a couple of years ago.  It's from 1971 and is taken at St.Albans Vermont. 


My friend and fellow modeller Pierre Oliver suggested scratch building the sides and ends from styrene car siding, and using Accurail's fish belly under frame.  Tichy Train Group work train doors, windows, and  wood boxcar doors make up the basic assembly.

Just need a roof then.  I could not find a suitable roof in my stash or on the internet.  I could substitute a different roof, but roof's are so visible on the layout, so I wanted to get it right.

 I put the project back in my stash and then about a year later by surprise Pierre presented me with a resin casting of the correct Murphy flat panel roof.  He had just purchased the masters for the line of Canadian prototype resin detail parts formally marketed by Sylvan scale models and this roof is one of the offerings.  Pierre's Yarmouth Model Works doesn't yet have these parts ready for market but I'm sure it wont be to long.

After a evening and an afternoon of modelling here is where I'm at.


It has my usual level of detail, K-brake and all associated rigging/plumbing, wire grabs, nbw's, laser cut running board and some rivets for the bolster connections to the side frames. The vents are from Grant Line and City Classics.

I painted the window frames and surrounding areas, before adding the window glazing and gluing on the roof.  I will now just mask off the window frames and paint the rest of the car.  I don't like just masking the glazing as pushing to hard can send it into the car while masking.  I learned that lesson on a previous project......

I'm not sure what the car actually was used for though.  Is it a tool car or something else?  The three roof vent stacks sure are interesting.  The label on the door in the prototype photo says "Flamable"  -  "keep lights and flames away".  Hopefully one the blog's reader will know?


Friday 31 March 2017

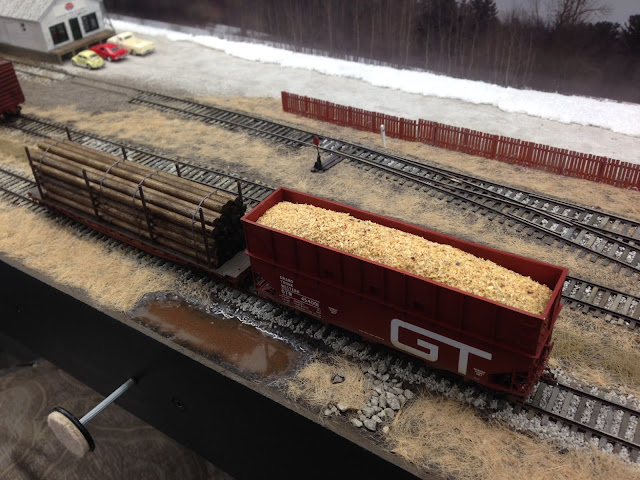
GTW Woodchip Hopper and Southern Flat

  I finally finished up the GTW wood chip hopper project.  These cars were loaded at Wilner Wood products of Norway Maine and billed to the Brown company in Berlin, NH, a pulp and paper plant.  I painted it with True Colour CN red #11.  I had the decals custom designed and printed by Precision Design Company.  As usual their service and decals are top notch.

  There were 21 cars in the series consisting of  #'s 454001 - 454021.  The first 14 were constructed during 1964-66, with the remaining cars built in 1971.  They were originally American Car and Fundry built 70 Ton offset side triple hoppers.  Wood extensions were added to increase the capacity.  My son made the load for it using foam and saw dust from our table saw.

    The Southern flat car is a resin kit available from Mask Island decals.

   It came with a laser cut wood deck, unfortunately the pocket holes didn't line up very well with those on the body, so I made a new deck from 0.060" V-Groove Styrene sheet. I scribed individual board lines on the edges to make them look like separate boards.

  The load simulates hydro poles made from Southern Yellow Pine logs.  They are 3/16" Poplar dowels stained with Minwax Dark Walnut stain. I also dusted them with some Bragdon powders.   The stakes are brass rod, turned down to fit in the stake pockets on one end and drilled on the other so they look to be made from steel tubes.  The Brass stakes and poles add much needed mass to this car.  The poles are glued together by flowing some thin CA on the end of the pile and are secured to the deck with metal strapping made from black construction paper.

  I gave the under body a full set of brake rigging, you can't see it but I know its there.

  The car  is painted with Scale Coat Oxide Red and decalled with the fine Mask Island Decals supplied in the kit.

  Both cars are fitted with Rapido's 70 Ton Barber S2A trucks.

Wednesday 8 March 2017

Rebuilt PRR X29's

  I finished up these two X29 rebuilds last night.  An X29B and a X29D.  Both are F&C kits.  I upgraded them with Yarmouth Model Works stirrups, Tichy wire, Kadee grabs and Plano etched metal running boards.

  The kit decals were not very crisp, but overall I am happy with them.  About a week after I put the decals on, Speedwitch Media announced new decal sets for the X29B, figures....

  As for weathering I went for a less is more approach. Dirty but not abused.  The X29D is on the left with the eight foot door, the X29B sports a seven foot door.


Wednesday 15 February 2017

Canadian Style Youngstown Doors

  A couple of months ago I started on five Postwar 40'  boxcars.  3 CN, 1 CP and 1 TH&B.  The base model I used was Intermountain Railway's 10'6" AAR Cars with 6' door openings.  These kits come with 5/5 Dreadnought ends or 4/4 Improved Dreadnaught ends and Murphy Raised Panels Roofs.

  The cars I wanted to model either had PS-1 style or diagonal panel roofs and NSC 3 style ends, save for the TH&B car which required the 4/4 IDE end.  I ordered some PS-1 car kits from Intermountain and stole the roofs from them for the CN cars.  The other three needed diagonal panel roofs so I ordered Branchline parts from Atlas.

  As for the NSC3 ends - I could have used Sylvan Scale models NSC3 ends, but I have never been happy with the pattern work, as its missing the rivets and weld lines between the panels and the shape of the ribs don't seam right.  To my eye they look like a compromise based on the available styrene shapes used to make the patterns. 
  
  So I designed my own 3D models and had the ends printed on a 3D printer.  I took measurements and pictures from an actual NSC built 40' boxcar,  at the West Coast Railway Museum in BC, a few years ago.  One of the models has Sylvan ends on it.  I had a set, so I decided to use them up.

  I added Archer weld beads to define the separate stamped panels that the prototype ends are built up from.  Archer rivets needed to be added on the sides of the part because, the 3D printer puts  support material on the side of the part to print rivets sticking out - this messes up the face when the support material is removed.   I elected not to put them in the 3D model.  The support material leaves a different texture on the part that would show up after painting.  The rest of the rivets are in the print, but do to the colour of the plastic they don't show up in pictures.


   The project stopped when I got to the point where I needed to add the doors.  The kits come with Youngstown doors with early roller fixtures. Youngstown doors with late style fixtures are available, but they do not have the correct rib pattern and the panels are not riveted in the valleys between the ribs - as on the Canadian version of the Youngstown door.

 These are available form Sylvan Scale Models but the moulds are old and need to be redone, so the parts don't come out very good anymore.

 The solution was to cut and spice two of the American version of the door into a Canadian version. Add Archer rivets, then make a Silicone RTV mould.  Something I have never tried.

  I made a trip out to Sculpture Supply Canada in Etobicoke with Doug Currie and the nice folks there helped us select the products I needed to make the mould and cast some parts.  Here's what they recommended.  The mould release is an extra thin version, which works better for highly detailed parts, The Smooth Cast 320 is an off white colour that they said would tint easier. 


  I glued the new door into a Styrene box and followed the instructions to make the Silicone Mould.  Doug came over to help out with the poor etc, and having an extra set of hands was very helpful.

  The silicone I used is a platinum cure type that mixes 1 to 1, and doesn't require degassing.  The mould turned out great. It has a few air bubbles on the back side but nothing on the part face.  It cures quick also, 30 minutes per the instructions.  I left it a bit longer just to be safe. 

   Casting took some practice.  I managed to make 8 good doors in about 14 attempts.  I poked the air bubbles out using a toothpick and slid a backer plate onto the back of the mould, but on top of a sheet of thin slippery plastic - rather than dropping it face on.   Using these tricks I had good parts coming out of the mould.  I ended up not using the tint. It was much easier to find air bubbles in the clear resin.  The resin turns off white as it cures.  I only needed 8 parts as the TH&B car will use the earlier style door included in the kit.

Here's what everything looks like.


I actually glued on the kit doors and let this project sit, while I came to the eventual realisation, that I would not be happy with the wrong doors on these cars.  I managed to get them off with little damage.

  In the end this project was pretty easy to do and a lot of fun, I should have just got on with it from the beginning.

At this point I have no interest in laying out a whack of Cash for Vacuum pots/pumps or pressure vessels to make full car bodies etc. 

Now I can get back to finishing these cars.  More to come....

Monday 6 February 2017

1932 ARA Boxcars

Over the past few months, neighbour and fellow modeller Doug Currie has joined me in the workshop on Monday nights, for what we call Modelling Monday.  The project we undertook is the construction of 1932 ARA Boxcars.  We both picked up an F&C kit while attending the New England RPM in Enfield, CT.  Doug built a CP car while I built a MEC Car.  We finished them up a couple of weeks ago.


The cars were constructed according to the kit instructions, but with a few detail part upgrades.  We used Tichy wire in lieu of the floral wire in the kit for the air lines and brake rodding.  Yarmouth brake levers along with Tichy turn buckles cut down to resemble clevises and Moloco rubber air hoses completes the under body replacements.  Up top we used the excellent Yarmouth laser cut wood running boards and Kadee bracket grabs on the sides and formed our own cut levers attached with Yarmouth eye bolts..


Doug used the supplied kit decals, while I used a Microscale set to model a rebuilt MEC car in the pine green scheme,  representing a car in my 1966 time frame.

Weathering was done with Pan Pastels and artists oils using prototype photos as a guide.  We are both very happy with the finished models.  I had a great shot of the roof of the MEC car, so I went all out trying to recreate the rusted look on the raised panels.  After the photos were taken we cut off the trip pins on the couplers and painted the couplers and air hoses a rust colour and black respectively.


Doug has been involved in the hobby for a long time now, but he admitted that this is the first model he has built in over 25 years.  I'm happy that I was able to get Doug out of the arm chair and back into doing some actual modelling.  We've already started our next project, so I guess I didn't drive him too crazy!!