Showing posts with label Scenic Details. Show all posts

Monday, 12 December 2016

Board Fencing

While most of my modelling efforts of late are focused on building rolling stock for my future GT layout, work on the Algonquin continues.  I've decided to add a fence to the yard scene in the town of Whitney.  I want it to frame an area where the railroad stores things like ties, tie plates, rail etc. next to the MoW shed.

At first I considered buying strip wood and making it myself, but after comparing the cost of the strip wood, to the cost of a Blair Line laser cut fence kit I quickly bought the kit.  The strip wood, would've cost about a third more and I'd have to cut it all myself on the chopper.

I assembled the fencing in sections, with the posts spaced so they would be evenly spaced after installation on the layout.  I stained them with a Hunterline Red stain.  I wasn't pleased with the look, so I tried the kits instructions instead. The kit says to prime with grey (I used a rattle can) and then brush paint the colour of your choice.  I think they came out great.  I dry brushed the top coat to give a weathered look.


Next up is to install the fence and take a few photos. 

Sunday, 17 January 2016

Propane Supply

    I just finished painting and decaling the propane tank for the Feed and Supply dealer in the town of Whitney.  The tank is a GLX model.  I painted it with Proto Paint.  This is an acrylic based paint.  It says its ready to airbrush on the bottle, so I gave it a try.  It went on kinda lumpy.  For the second coat I thinned it with Tamiya acrylic thinner and it went on better, although not as nice a Valleo Model Air paint.  I'm not a huge fan of acylic paints other than those by Valleo.  I've had enough experimenting with paint I'm going to stick to Valleo Model Air or Tru-Color from now on.  I've had excellent results with both.

Here's the recently finished Propane Tank Truck backing in to fill up the tank at the Feed and Supply dealer.  Soon to be ready to fill up all the Cottagers BBQ tanks.  I mounted a small BBQ tank sign on the out building behind the Feed and Supply as well as a "Shur Gain" Grain Dealer  Sign.


Friday, 3 July 2015

Operations Prep #2

 It's been awhile since my last post.  I have been busy, mostly with non hobby related things.  An unexpected house reno, canoe trip and with hockey playoffs to watch, I haven't got much done.  I did managed to make some head way on my pre op session list from my last post.

 I built a Way Bill box and mounted it to the fascia. Still need to make one in HO scale for the depot.

 This was a fun project and something that my son helped with.  He's only five but really loves working with tools and helping out in the work shop.  Currently my efforts are in teaching him how to measure and he's getting the hang of it.  I have him do tasks such as, set the fence on the table saw,  measure and mark wood pieces to cut, setup the compass and  draw circles.  All in the imperial system.  He can learn metric in school.....


I have made no progress on the Waybills. I have put this off long enough, so the plan is to do one per night and tune up each freight car that it matches.  Maybe if I get on a roll I will get more than one a night done.

I cleaned the track and applied graphite.  What a difference to electrical performance, I highly recommend doing this simple but effective treatment.  I was surprised how little you need to apply, the locomotive and freight cars help to spread the graphite around to all tracks.  For cleaning I use a 900 grit Arkansas Stone.  Is hard, so it slices off any dried glue etc, very easily but such a fine grit that it doesn't wear away at the rail head, rather polishes.

As for modelling, I did manage to finish a couple of things.  I mounted switch stands to all 7 turnouts on the layout.  A nice detail and simple one evening project.


 I finally finished up the Superior Propane Tank Truck.  I had to mill out a pocket on the bottom of the tank in order for it to sit at the right height on the frame.  Once this was complete I painted and applied decals from Microscale  I think it turned out pretty good.  One interesting thing about the yellow paint does bother me though.  The paint under my spray booth light matches the Athearn cab paint very close, but under the layout lighting it looks greenish compared to the cab.  It is something to note for future paint projects.  Make a test paint chip and check under the layout lights.


Next up is to finish the matching Propane Tank that will be part of the Feed & Supply dealer.  


Tuesday, 24 March 2015

Log Loader Part 2


Over the weekend I managed to get the GHQ Log Loader painted.  I learnt the hard way not to prime anything you want to paint yellow, with grey primer.  It took around 10 coats of paint to build up the opacity of the yellow paint.  Next time I will prime with white.  I even painted the figure in the kit.  So far this poor soul is the only figure on the layout.  I guess he will have to run the locomotives and do switchman duties also.  Maybe I should get some some other workers to help him with his workload.


I painted the hydraulic cylinder pistons silver using a silver Sharpie marker.  It covered in one coat and with no paint build up that would make them appear even thicker.  I did a bit of weathering on the radiator grills and wheels.  I may weather it a bit more, but I don't want to over do it.  Tom Patterson asked how big the loader is, so I included a couple of photos of the loader on my cutting mat which has inch graduations.  The loader is 1" wide by 3 3/4" long including the grip forks.  This was one of the most rewarding projects I have worked on for the layout.  So much so that I'm going to order a GHQ front end loader kit.


Friday, 20 February 2015

Log Loader

Over the last two evenings I have been working on a GHQ pewter kit of a log loader.  This is the first time I have built a kit from pewter.  The castings in the kit are almost flash free.  Only a little cleanup was needed.  I put it together with medium CA glue.  I left off the roof, which I will paint when I spray the loader.  Leaving off the roof means, I can install the seat and figure after I spray the loader.  I used a product called MR. Surfacer, to fill in small hair line cracks and a small mismatch line of the casting in the engine area of the loader.  It's similar to putty but you can brush it on.   This is the 1200 version, I believe there is a 600 version which is a bit thicker.  While designed for styrene, it worked well on the pewter.


My son helped me on this model, for his effort I let him decide if we should model the loader with the arm up or down.  He choose up.   I will paint and install the wheels separately.  I will let the filler dry overnight and then sand the model prior to paint.


Wednesday, 18 February 2015

Rental Canoes and Flange Way Signs

Tonight I built a rack to hold canoes.  The town of Whitney on the east side of Algonquin Park is the last stop for campers to rent a canoe before entering the park.  While my version of Whitney is freelanced I am trying to give it the look and feel of a North Ontario small town.  Pretty much every town in the north has somewhere to rent canoes and purchase fishing bait and tackle.  Whitney on the Algonquin has "Jim's Bait and Tackle"  (named after my Dad.)  To construct the rack, I used scale 4x4's and 2x4's  and stained it with Hunterline Cordovan Brown.  The canoes are from Sylvan Scale Models and come 3 to a pack.  They need another coat of paint and I may pick up another package to fill out the rack.  The ice would still be on the lakes, in the park during early April, so it is unlikely that many canoes would be rented at this time.


I also put together a package of Flange Way signs from Osborn Model Kits.  The kit comes with printed labels for the sign face making these an easy 1 hour project.  I decided to use the CP prototype labels with the white face and black dots.  The kit also comes with the CN version that has the black face and white dots.


Monday, 16 February 2015

Switch Stands and Whistle Posts

Feeling good about finishing the Line Poles yesterday, I decided to tackle two projects this evening.  I started with Switch Stands.  I basically followed the instruction in the Osborn Model Kit package.  Here is the results after assembly and some back paint.


I like the stands and the ease of installing the targets.  The targets are made from yellow stickers, that you fold over the posts.  The only thing is, the targets look like stickers you have folded over the post and not really like targets.  If you look at the prototype photo on the kit packaging you can see that the target is sheet metal and attached to one side of the post.  So the sticker method while easy isn't very prototypical.  I needed to make some new targets.  I grabbed the Magnuson Models package the Tank Truck came in( see my post from 2 days ago), and proceeded to cut, sand and shape new targets from the clear packaging material.  I wasn't being cheap, I just didn't bring any sheet styrene with me.  Here is what I ended up with.  I also decided I like red targets better.  It needs another coat of paint on the target, but it looks much better.  It has the target only on one side of the post.

Here is all six I made up.  I also made an extra target for a stand I have already installed on the layout.

The second project I finished up was sanding and painting a package of whistle posts.  Again from Osborn Model Kits.  ( I have no financial interests in Osborn, I just like supporting a local Canadian hobby business).  Nothing to fancy here, just some black paint in the 'W' and then dry brush on some white paint.


Sunday, 15 February 2015

Line Poles

Tonights Project was to put together Line Poles for the right of way along the Algonquin mainline.  I purchased a kit from Osborne Models that includes 12 poles and cross arms with insulators.


The cross arms are laser cut and the poles look like bamboo skewers.  After cutting the cross arms from the fret, I spent an hour sanding and scrapping the edges to remove the burning from the laser.  I also sanded the faces of the cross arms as well as the poles.  I planned to stain the parts and I find sanding the edges makes the stain go on evenly.  The picture below shows the difference between one fresh from the fret and one that has been cleaned up.


The insulators are part of the cross arms and look very two dimensional, as they come in the kit.  I spent some time and sanded each one to a more round profile.  This sounds like a lot of work, but probably took about a half hour to complete 12.  The next step was staining with Hunterline stain.  I like using this product, as it is alcohol based and doesn't warp thin wood parts.  I used Cordovan Brown for both the arms and poles.

While waiting for the stain to dry I decided to consult an article about Line side Poles, in a Model Railroader special Edition called "How to Model the Trackside Scene".  The article pointed out that the top of poles should be cut on an angle to help prevent rot from snow and water damage.  The prototype poles also have a grove cut into the side where the cross arm goes so the weight of the arm is sitting on a solid base and not only held on by fasteners.  I made these modifications to the poles and touched up the staining.

I wanted to have green glass insulators on the cross arms.  I painted them with Tamiya Clear Green paint.  They looked black, not green at all.  I decide to paint hem a light grey and when dry follow up with the Tamiya Clear Green.  The light background colour trick worked and the insulators looked good to me.  This was a great one evening project, more so that they are ready for mounting along the Algonquin mainline. Here is picture of the completed poles.


Saturday, 14 February 2015

Taking My Own Advice

Last Sunday I had the pleasure of attending the Copetown Train show with 3 other modellers.  I hadn't attended this show in a couple of years and it was worth the trip yet again.  I met a few other modellers who read my blog and one who's blog I read regularly.  I even managed to pick up some 40' Plano roof walks, that had been holding me up on other projects.  On the drive home a discussion about what Trevor Marshall should tackle next on his layout started.  I don't remember the details other than my suggestion to him was to work on something he hadn't done in a while.  This got my thinking......

I am now off for a week long break from work with the family and this usually means I bring a couple of freight car kits to build in the evening.  Car kits take few tools and aren't to messy to deal with when away from the work bench. I paint and decal them when I get home.  What I have ended up with over the last year is a big pile of built, but not finished car kits.  Over the past few months I have cleared out the pile and only have a bit of weathering and a few re weigh dates to decal.  So before packing up more car kits to build on vacation,  I decided to take my own advice and work on something I haven't done in a long time.

I dug into my box of scenic details and collected everything I have, along with a few tools and paints.  I plan to work on a different project each night and follow up with a blog post.

Scenic Project 1.

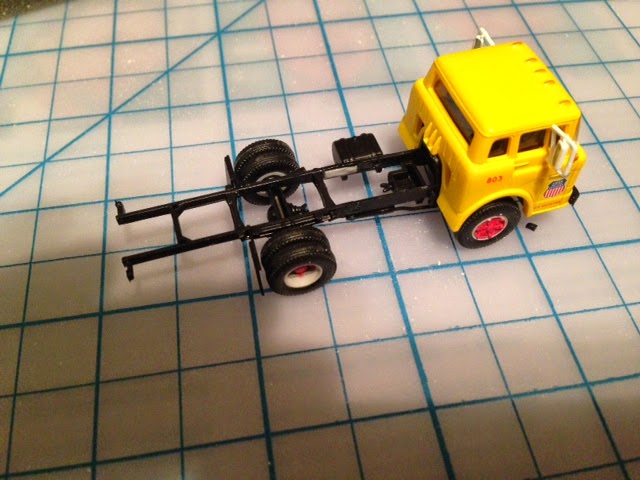
Superior Propane delivery Truck.  The feed mill and supply business on the Algonquin also refills propane tanks. I wanted a Truck for deliveries.  I couple of years ago I purchased a Magnuson Models Cast Resin Ford Propane Delivery Truck.   I opened the box the other day when packing and noticed the Cab was solid with no easy way to make see through windows.  They are meant to be painted.  I wasn't really happy with this...... so I made a quick trip to Hornet Hobbies for some paint and maybe some advice on how to deal with painting the windows to look like glass.   Well when I got there the solution presented itself.  I found an Athearn Ford C series Truck with stake bed, painted in UP Armour Yellow with Red wheels hubs.  Somebody wanted me to find this I guess.  (Superior Propane Trucks are yellow).  I grabbed some UP Armour yellow paint to match.  On the way to our vacation destination I stopped in at the Barrie Train Show.  One of the dealers had a set of Microscale Superior Propane Decals.  The stars seam to be aligning on this project.


I started by cutting about 0.540" out of the middle of the frame and gluing it back together, along with shortening the drive shaft.  I braced the frame with short pieces of HO scale 1"x6" styrene.


Next I removed the mud flaps and cut 0.375" from the frame behind the wheels.  I glued the rear sections back on.  I managed to remove the UP Shield by scrapping with a hobby knife.


 I cut the cab mounting tongue from the tank with a razor saw and also removed the cast on fuel tank.  This is where I ran into a road block.  The Magnuson Model tank is also its frame.  When placed on the Athearn frame it sits about 0.125" to high.  I couldn't sand it down, as that would ruin the box extension on the rear of the tank.  I need to cut a channel or slot into the tank sub frame to lower the tank to the correct height.  There is no easy way to do this with the tools I have on hand.  I will use my milling machine to cut a slot when I get home.   So after all this I am going to go home with yet another incomplete project........I guess its just time for  a Brew...